disclosure: as an amazon associate, I earn from qualifying purchases made in this post. thank you for supporting my blogging journey.
The idea was not mine originally. We will just get that out there! This brilliant Summer Craft idea started out when I saw Kelle Hampton of Enjoying the Small Things post about her kids Summer Passports on Instastories.
I had an ah-ha moment in the idea of what this might be, since zero real details were given in her story. My brain went in every different direction, I went on the classic google hunt, but came up empty. Moved over to Pinterest and typed in Summer Passport but didn’t find a whole lot.
Back to the drawing board, I tried to build on the inicial thought of a fun Summer Craft, a Summer Passport. What might that look like? Maybe a passport that would take us through Summer Vacation, getting stamped along the way, all while collecting forever memories? The idea was there, now I needed a visual.
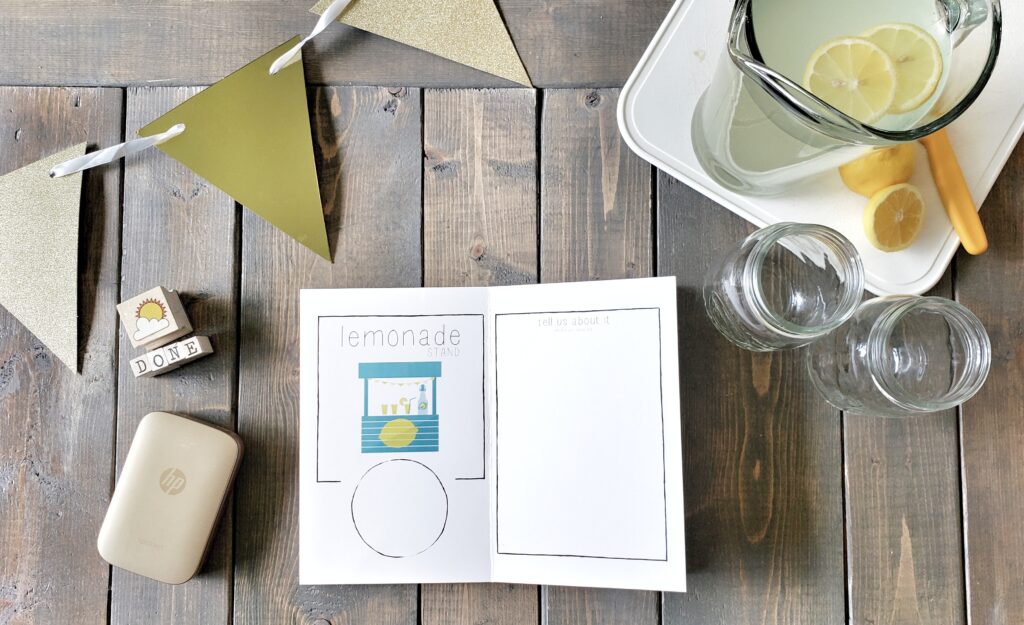
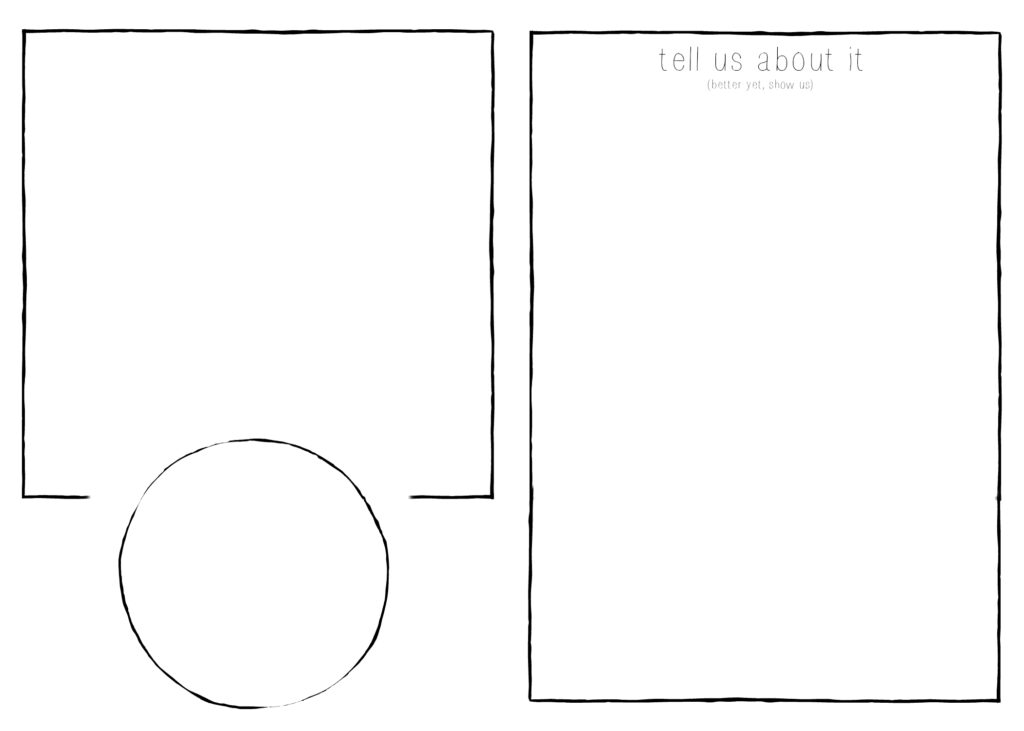
I created a list of all the things we were planning to do for the Summer and started sourcing out images that would represent each event. From road trips, to waterslides, lemonade stands and crafts. We then moved over to the designing process; what might a page in a Kids Summer Passport book look like? It needed a place for a completion stamp. And of course an area for the kids to share their favorite memory or photo in the moment.
And that’s when I came up with this for a basic template:
Summer Craft – FREE PASSPORT TEMPLATE
It was simple, it was fun, IT WAS PERFECT! I started to fill in each page with our upcoming plans, gave them all a title and sent them all off to the printers. DONE AND DONE!
You’re welcome to use the template above to make your own Summer Passport. Below are the written step-by-step instructions on how to put it together. But, if you’re like me, and more of a visual learner, I gotchu’boo. I also made a little video tutorial for you to follow along below.
Summer Passport Step-by-Step Instructions
- I used PicMonkey.com to design the basic passport template. Once complete, I added in my titles and images, saving them all to my computer individually.
- I then printed off each page on a 100lb cardstock (80lb would be just fine) and folded them in half (printing on the inside).
- Once I had them all folded I clipped them tight with binder clips.
- I then took white school glue and topped the edged with a thin layer. Once dry, I did it a second time for good measure.
- Finally, I took a scrap of white vinyl and cut a piece the exact length of the passport book and with enough to have it overhang onto the front and back covers by about 3/4″. I topped the books edge with this for a nice finished product.
- Next, I glued each open page together so that you could flip the pages from one to another without seeing any blank pages between.
- And to conclude, I made a very simple cover page (using this image I made), colored it in, and glued it to the front cover.
Video Notes: The mini printer you see in the video is an HP Sprocket (buy here: US and CAN). It’s a portable instant printer that prints photos from your phone. The HP Sprocket is rechargeable through a Micro USB, connects to your phone through Bluetooth, and doesn’t require ink, but instead Zink HP photo paper to work (buy here: US and CAN). Much more affordable that other options on the market when it comes to instant photo film (about $0.50 a photo vs. the $1.25 that averages most other competitors).
And that’s a wrap! I hope you can all get to making your own Summer Passport Books for your kids this Summer, and if you do I would love to know about it. Tag me on Instagram in your images or instastories this Summer and show me what you get up to using your Summer Passport!
***
Hey! Are you following us on social media?
Facebook // Twitter // Instagram // YouTube // Pinterest
Wow,so excited Summer is here.Hope you and the family have a fun Summer,play safe!
Loving this! What an excellent idea!